Current & Recent Projects
56 1/2" Bradbury Upright (F.G. Smith) #27867 (1897)

56 1/2" Bradbury Upright (F.G. Smith) #27867 (1897)
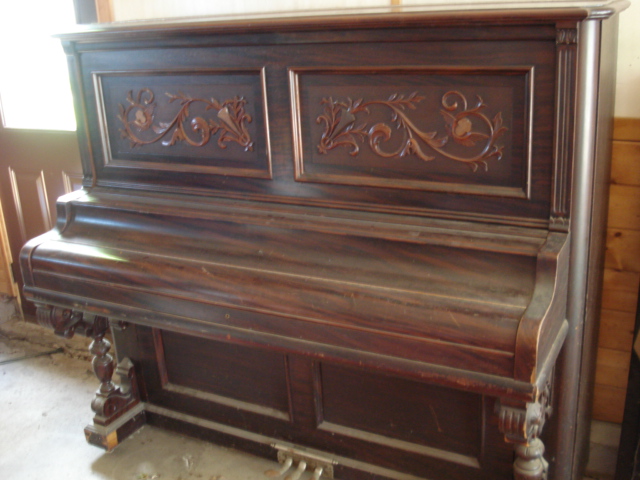
Vintage mahogany Cabinet. Built in 1897. Restored in Fall 2021 for the owner in Foley, MN.
IMPROVEMENTS:
Sound Board, Pins, Strings--Remove strings, tuning pins, plate. Repair & refinish soundboard. Restring & repin.
Recondition Action & Pedal BoardInstall new hammers, damper felts, butt leather, jack springs, key bushings, underkey punchings. Tighten all action screws, replace other defective parts as needed. Dismantle & rebuild pedals, posts, levers.
Complete Regulation & TuningAll adjustments to ensure that piano plays like new, tune to A-440.
Complete Refinishing--Dismantle music rest, fallboard, legs, panels: prepare exterior surfaces for refinishing. Remove pedals & backplate for nickel-plating. Complete refinishing, install new fallboard decal.
 |
A1 - Beautiful cabinet, very little damage |
|
 |
A2 - Ornate music rest |
|
 |
A3 Hinged lid |
|
 |
A4 - Veneer damage on left foot |
|
Selected pictures of the step-by-step improvement process
CLICK PICTURE FOR LARGER IMAGE, THEN CLICK "CLOSE" TO RETURN TO THIS PAGE
Original Manufacturer of this brand-name--Bradbury Piano Co., with F.G. Smith as superintendent.
Established--1861, by William B. Bradbury
Other brand-names used by this manufacturer--F.G. Smith, W.P. Haines, Winter & Co., F.C. Lighte, Lighte & Newton, Lighte-Newton & Bradbury, Lighte & Bradvury, Poole, Ivers & Pond.
From: Pierce Piano Atlas, 12th Edition (2008, Larry Ashley Publisher, Albuquerque, NM).
Note: To obtain the age of your piano and details about the manufacturer, click: Pierce Piano Atlas--"the world's most authoritative publication on piano manufacturers, past and present." To learn how a piano works and how to go about buying one, we encourage you to purchase The Piano Book.
A - EVALUATION
B - DISASSEMBLY, DESTRINGING, BOARD REPAIRS, RESTRINGING
 |
A5 - Veneer damage on right foot |
|
 |
A6 - Missing veneer at right top |
|
 |
A7 - Veneer damage at front right corner |
|
 |
A8 - A few replacement bass strings and large-size pins, new bridle tapes |
|
 |
A9 - Pin torque about 20-25, needs restringing, repinning |
|
 |
A10 - Needs new dampers, hammers, catcher leather, jack springs, underkey punchings, hammer rail cloth, & key cloth |
|
For contact information, go to the "Home Page"
"Before picture" - taken during evaluation
C - RECONDITIONING THE ACTION
 |
B1 - Panels, Keybed, Pedalboard removed |
|
 |
B2 - Left Foot reglued. |
|
 |
B3 - Pedals & backplate cleaned, ready for nickle-plating |
|
 |
B4 - New casters installed |
|
 |
B5 - Left foot assembly re-glued to side-wall. |
|
 |
B6 - We prepared a stringing guide for the treble section, including heights of pressure bars and action brackets above the plate. |
|
 |
B7 - Original bass strings removed, arranged in order on a soft wire. |
|
 |
B8 - Bass strings packed for shipment to string-maker. |
|
 |
B9 - Bass strings ready for shipment to string-maker |
|
 |
B10 - Removing treble strings |
|
 |
B11 - Removing tuning pins |
|
 |
B12 - Plate screws & action brackets arranged on cardboard guide for ease in re-installation |
|
 |
B13 - Plate lifted with winch, ready for repairs to board, bridges, pinblock |
|
 |
B14 - Glue & clamp upper frame and pinblock |
|
 |
B15 - Increase tuning pin holes by a quarter inch for longer replacement pins |
|
 |
B16 - Sand pinblock surface |
|
 |
B17- Scrape and sand soundboard |
|
 |
B18 - Repair treble bridge in two places |
|
 |
B19 - Treble bridge repair |
|
 |
B20 - Using electric heater and with the piano insulated with packing blankets, the soundboard is dried overnight to widen soundboard cracks |
|
 |
B21 - Every open crack is shaped at a V angle with a shimming tool |
|
 |
B22 - Soundboard shims are cut and glued in place |
|
 |
B23 - Using a special chisel, tops of shims are cut so they're even with the soundboard surface |
|
 |
B24 - Graphite is brushed on bridge surfaces between the bridge pins |
|
 |
B25 - We drilled two test holes at the top treble end of the pinblock to check pin torque. We decided to replace original size 1 pins with size 3 pins. |
|
 |
B26 - We cleaned the piano plate and slightly enlarged the pin-holes to accommodate larger-size tuning pins. |
|
 |
B27 - The first coat of urethane was brushed onto the surface of the soundboard and bridges. |
|
 |
B28 - After 3 coats of urethane, we winched the plate in position onto the piano frame |
|
 |
B29 - With the plate bolted in position, we used the Klepac Chart to correct the stringing scale. |
|
 |
B30 - The treble section has been restrung and repinned, and the pressure bar has been installed. |
|
 |
B31 - Using a pitch-pipe, we chipped up the pitch of all treble strings. |
|
 |
B32 - We installed stringing braid in the treble section. |
|
 |
B33 - We restrung the bass section with new bass strings and installed stringing braid. |
|
 |
B34 - Before cleaning and reconditioning them, we temporarily installed the keyboard and the action and tuned the piano, to ensure a stable tuning when the project is completed. |
|
 |
B35 - The harp is packed, ready to be shipped to the refinisher |
|
 |
B36 - Fifteen panels and parts facing the exterior of the piano are ready to be shipped to the refinisher |
|
 |
C1 - We repaired unglued sections of the key frame. |
|
 |
C2 - We cleaned the keyframe wood and the keypins, and installed new felt punchings. |
|
 |
C3 - We cleaned the keys, keytops, and capstans with steel wool, and with the keys on the keyframe, we rough-regulated key heights and keydip. |
|
 |
C4 - We removed the spring rail, sustain rods, regulating rail and the dampers from the action for close inspection of all action parts before deciding on replacement parts to order. |
|
 |
D1 - The keybed, music desk hinge frame and lower panel have been stripped. |
|
 |
D2 - The fallboard, bottom rail and lid have been stripped. |
|
 |
D3 - The right leg and end blocks have been stripped. |
|
 |
D4 - The cabinet exterior has been sanded, ready for stain |
|
 |
D5 - The music desk and panels have been sanded and are ready for stain |
|
 |
D6 - The legs and end blocks have been sanded |
|
 |
D7 - The cabinet exterior has been stained |
|
 |
D8 - The music desk has been stained |
|
 |
D9 - The legs and end blocks have been stained |
|
 |
D10 - The lid, music rest and fallboard components have been stained |
|
D - We partnered with Mike and Tammy Frank of Frank's Custom Furniture, Foreston, MN, for REFINISHING WORK on this project. Pictures in this section were taken in their shop.
E - After refinishing was completed, the piano and all refinished components were returned to our shop for FINAL ASSEMBLY, ACTION REGULATING, AND TUNING.
 |
E1 - We installed the bottom board, keybed, and decorative legs, and we reconditioned and re-assembled the pedal mechanisms. |
|
 |
E2 - We installed the keyframe, and glued new key cloth in place on the back rail. |
|
 |
E3 - We installed the reconditioned action, and we assembled and installed the nameboard and fallboard assembly, and we regulated key heights just below the nameboard felt. |
|
 |
E4 - We fine-regulated key heights using a straight edge, and we fine-regulated keydip to ensure consistent touch. |
|
 |
C5 - We decided to order new hammers, shanks, and butts. We removed seven hammers to send to the hammer supplier as samples. |
|
 |
C6 - We cleaned and polished the sustain rod and the hammer rail, installed new hammer rail cloth, and replaced faulty hammer springs and regulating buttons. |
|
 |
C7 - We refinished the pedal board, and we installed and re-bushed the newly nickel-plated pedals. |
|
 |
C8 - We removed the old damper pads , cleaned the wooden and metal parts of the damper lever assemblies, and strengthened the damper flange springs. |
|
 |
C9 - We repaired damaged locations on the brass rail to ensure tight fit for the hammer butts. |
|
 |
C10 - We installed new even-numbered hammers and butts. |
|
 |
C11 - We installed odd-numbered hammers and butts. |
|
 |
C12 - We connected bridle tapes of the new hammer butts to the wippens and regulated back-checks. |
|
 |
C13 - We re-installed the cleaned sustain rod system and replaced the felt bushing connecting the two rods. |
|
 |
C14 - We re-installed the cleaned damper levers. |
|
 |
C15 - We installed new treble damper felts. Bass damper felts will be installed as part of re-assembly after refinishing has been completed. |
|
 |
E5 - We fine-regulated key spacing and tightened wobbly keys by turning under-key pins. |
|
 |
E6 - We fine-regulated black key heights using a key height guage. |
|
 |
E7 - We fine-regulated hammer-to-string alignment by heating and turning hammer heads and moving strings where needed. |
|
 |
E8 - We fine-regulated letoff, sustain adjustment and spoons in treble section. |
|
 |
E9 - We shaped and installed new damper felts at the ends of the bass section, then regulated sustain adjustment and spoons for newly installed bass dampers. |
|
 |
E10 - We removed the action and, with the action on the workbench, we regulated the spoons and damper wires in the bass section. |
|
 |
E11 - On the workbench, we also regulated damper wires and spoons in the treble section, as needed. |
|
 |
E12 - With the action back in the piano, we installed the rest of the bass damper pads. |
|
 |
E13 - We found that the pitch was almost a tone flat since installing and chipping the strings to pitch. Several pitch adjustments and tunings will be needed before delivery. |
|
 |
E14 - We installed the lower panel, the fallboard assembly, including hinges, rubber buttons, and knobs. |
|
 |
E15 - We installed the music desk, which swivels on hinges supported by a frame behind it. When the fallboard is opened, the bottom of the music rest swings outward. |
|
 |
E16 - Close-up of the Bradbury decal and the middle keys. |
|
 |
E17 - We assembled and installed the hinged lid, with black rubber buttons to protect the finished surfaces. |
|
 |
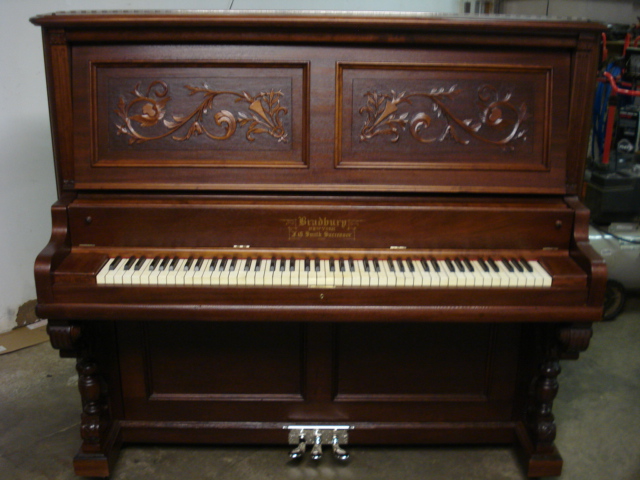
E18 - Project finished! After one final tuning, it will be delivered to the owner. |
|
Close-up of new decal and keyboard
Project Finished! To be delivered after a final tuning