Current & Recent Projects
57 1/2" Strohber Upright #108857 (1909)

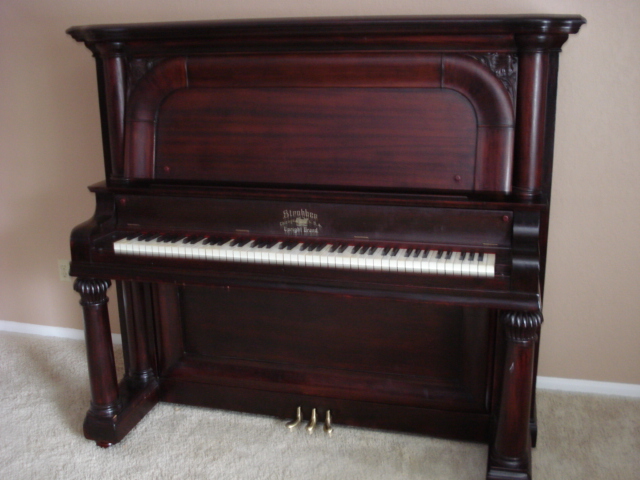
57 1/2" Strohber Upright #108857 (1909)
Traditional Mahogany Cabinet. Cabinet finish "refreshed" by a previous owner. Reconditioned in February, 2021 for the current owner in St. Cloud, MN.
IMPROVEMENTS:
Recondition ActionInstall new pedals, hammers, shanks, butts, damper felts, underkey punchings. Replace worn backcheck felts and weak jack springs. Clean & tighten all action screws, replace other defective parts.
Complete Cleaning--Clean cabinet interior, strings, pressure bar, keybed, keypins, pedal mechanisms.
Complete RegulationAll adjustments to ensure that piano plays like new. Adjust pitch & tune to A-440.
 |
A1 Set Action on Workbench |
|
 |
A2 Repair Music Desk |
|
 |
A3 Install new music desk hinges |
|
 |
A4 Install new music desk knobs |
|
Selected pictures of the step-by-step improvement process
CLICK PICTURE FOR LARGER IMAGE, THEN CLICK "CLOSE" TO RETURN TO THIS PAGE
Original Manufacturer of this brand-name--Smith, Barnes & Strohber, Chicago.
Established--as C.A. Smith & Co. at 1872 Clybourn, Chicago in 1891.
Other brand-names used by this manufacturer--Diminutive, Hoffmann, Lessing, Smith & Barnes, Strohber and Willard.
From: Pierce Piano Atlas, 12th Edition (2008, Larry Ashley Publisher, Albuquerque, NM).
Note: To obtain the age of your piano and details about the manufacturer, click: Pierce Piano Atlas--"the world's most authoritative publication on piano manufacturers, past and present." To learn how a piano works and how to go about buying one, we encourage you to purchase The Piano Book.
 |
B1 New lid hinge pins installed |
|
 |
B2 Inspecting broken pedals |
|
 |
B3 Installing piano tilter |
|
 |
B4 Tilting piano on its back for pedal replacement project |
|
A - IN OUR SHOP
For contact information, go to the "Home Page"
B - AT THE PIANO OWNER'S HOME
Selected pictures of the step-by-step improvement process
CLICK PICTURE FOR LARGER IMAGE, THEN CLICK "CLOSE" TO RETURN TO THIS PAGE
An elegant vintage piano--a real pleasure to recondition!
 |
A5 Clean all keys, replace missing and chipped keytops |
|
 |
A6 Remove bridle tapes & regulating rail |
|
 |
A7 Remove dampers & hammer spring rail, tighten all action screws |
|
 |
A8 Reglue loose jack |
|
 |
A9 Repair end block |
|
 |
A10 Cut off 7 warped hammer shanks |
|
 |
A11 Install 7 new hammer shanks |
|
 |
A12 Remove worn catcher leader in mid-section |
|
 |
A13 Install new catcher leather in mid-section |
|
 |
A14 Clean & lubricate regulating rail |
|
 |
A15 Replace broken regulating button |
|
 |
A16 Remove treble damper pads |
|
 |
A17 Sand damper blocks |
|
 |
A18 Replace broken damper lever flange |
|
 |
A19 Remove hammer rail cloth |
|
 |
A20 Strengthen & clean hammer rail springs |
|
 |
A21 Remove old evens hammers, clean shanks. |
|
 |
A22 Install new evens hammers, align to old odds hammers |
|
 |
A23 Remove old odds hammers, clean shanks |
|
 |
A24 All New hammers installed |
|
 |
A25 Regulating rail re-installed |
|
 |
A26 Bridle tapes connected to wippens |
|
 |
A27 Bridle tapes glued in place |
|
 |
A28 Damper levers re-installed, new damper felts glued on damper blocks. Action reconditioning project completed! |
|
 |
B5 Pedal board removed |
|
 |
B6 Positioning new middle pedal |
|
 |
B7 Pedal board with new pedals ready for re-installation |
|
 |
B8 - Close-up of new pedals |
|
 |
B9 - Massive frame and harp--in very good condition |
|
 |
B10 - New Lid hinge pins installed, molding repair |
|
 |
B11 - New underkey punchings installed |
|
 |
B12 - New underkey punchings and cloth installed |
|
 |
B13 Loki, the owner's cat, was a frequent visitor during regulation and reassembly |
|
 |
B14 Complete regulation & tuning--hammer blow distance, capstans, dampers, key heights & leveling, hammer alignment to strings, key dip. . . |
|
 |
B15 - Music desk, fallboard, lower panel installed - PROJECT COMPLETE! |
|
 |
B16 - Close-up of keyboard & decal |
|